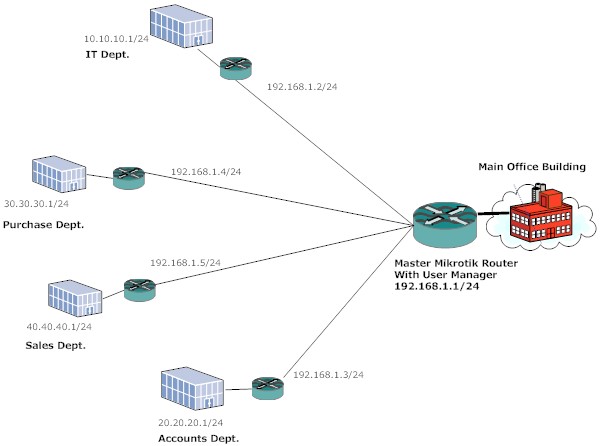
Requirements
Central location: MikroTik OS with User Manager (suggested License is L6).Hotspot: Mikrotik Routerboard with at least a L4 License
Network 192.168.1.0/24

R1-Hotspot Master
WAN IP- <Connected to Internet>
LAN IP – 192.168.1.1/24

R2-Hotspot IT Dept
WAN IP – 192.168.1.2/24
LAN IP – 10.10.10.1/24

R3-Hotspot Account Dept.
WAN IP – 192.168.1.3/24
LAN IP – 20.20.20.1/24

R4- Hotspot Purchase Dept
WAN IP – 192.168.1.4/24
LAN IP – 30.30.30.1/24

R5- Hotspot Sales Dept.
WAN IP – 192.168.1.5/24
LAN IP – 40.40.40.1/24
We assume that all the setup is ready and the hotspot is configured on R2, R3, R4, and R5 with local authentication.
First, we will configure R2, R3, R4 & R5 to use MikroTik user manager as a Radius server.
/ip hotspot profile
use-radius=yes


/radius add
service=hotspot address=192.168.1.1 secret=123456

This configuration will apply to all the Hotspot router.
Now, we will configure R1-Hotspot Master.
/tool user-manager customer add
subscriber=mikrotik login="mikrotik" password="ashish" time-zone=+05:30
permissions=owner parent=mikrotik

/tool user-manager router add
subscriber=mikrotik name="R2" ip-address=192.168.1.2 shared-secret="123456"

subscriber=mikrotik name="R3" ip-address=192.168.1.3 shared-secret="123456"

subscriber=mikrotik name="R4" ip-address=192.168.1.4 shared-secret="123456"

subscriber=mikrotik name="R5" ip-address=192.168.1.5 shared-secret="123456"
and finally add the user on R1
/tool user-manager user add
username=ashish password=ashishpatel subscriber=mikrotik
The user name and password will work for all the remote hotspot router…a user can login from any department of the company with same ID and password and we can have all the user data centrally.
Now you can log into the User Manager web interface on the address http://192.168.1.1/userman and start setting up your user accounts.


Tidak ada komentar:
Posting Komentar